Job schedules
The Job Schedules page allows you to access a comprehensive list of scheduled jobs and provides options to add or modify new jobs as needed.
To access the Job Schedules page, click  Automation > Jobs > Schedules.
There are three steps to creating a job schedule on the three tabs on this page as follows:
-
The Details tab, where you define the type of job you want to schedule.
-
The Schedule tab, where you specify the specific times for jobs to run.
-
The Jobs tab, where you can view the results of the scheduled jobs.
Note: You can now run jobs that were defined in Data Integration in Financial Consolidation. See details.
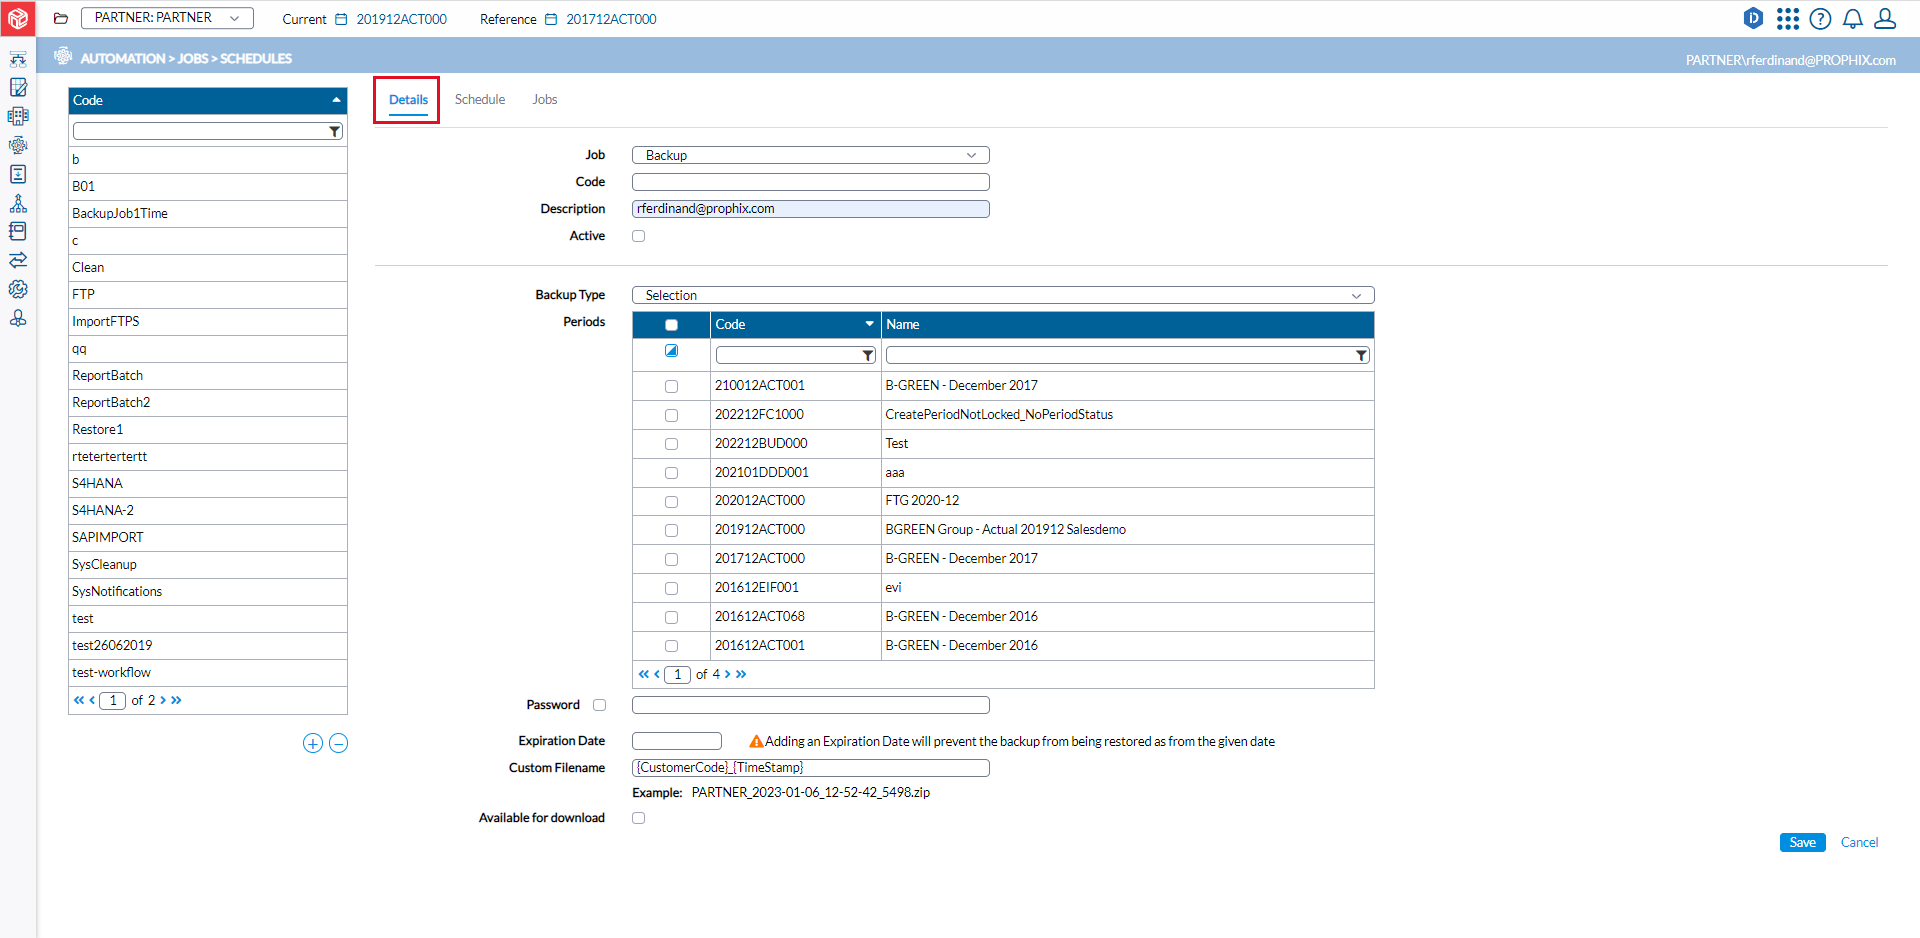
Details Tab
The Details tab is the default view of the Job Schedules page. It is where you enter Job Details.
Note: The layout of the Details tab depends on the type of Job selected.
Job types
The Job drop-down consist of a list of the job types that you can schedule. There are multiple Job types, including the following:
Backup job
This type of job allows you to make a backup of the selected consolidation periods at regular times. The Backup Job type contains the following parameters:
- Code - unique code for the job.
-
Description - description of the purpose of the job.
-
Select an activation option.
-
Backup Type - the type of backup you want to schedule, e.g., for all periods, open periods, etc.
-
Choose periods from the Periods table.
-
To select all the periods, select this box:
 (on the table header, beside Code column).
-
-
Optionally, use the toggle click
 (the toggle switch) as follows:
-
Click once to display only the selected periods.
-
Click again to display only the unselected periods.
-
Click once more to display all the periods (both selected and unselected).
-
- Password - to prevent users from restoring this backup at will, enter a password to secure the backup file.
-
Expiration Date - the last date by which the backup file can be restored.
-
Custom filename - a descriptive name for the backup file.
-
Periods - a list of consolidation periods, including their Code and Name, from which you can select to back up.
-
To allow other users to download this backup file, select the Available for download option.
-
Run or Schedule the job
-
Click
 or
or  to execute the job immediately (if active).
 -
To schedule the job for a future time, open the Schedule tab. For more information, see Schedule Tab.
-
Activation options
-
Active – When selected, the job runs immediately when you click
.By default, the job uses the Fixed Time schedule, which triggers it to run right away.
-
To schedule the job for a specific time instead, leave this option unselected.
-
- Executes the job immediately without changing its existing schedule.
This option is useful when a job has a complex schedule but needs to be run manually.
It prevents users from modifying the defined schedule unnecessarily.
Clicking
performs the same action as using a fixed schedule. This option is disabled when the job is inactive.
Restore job
This job type allows selected consolidation periods to be restored at regular times. Backup files can be restored from a File or a URL.
Restore backup from a file
-
In the Job Type drop-down, select Restore.
-
Enter Code and Description for the job in their respective fields.
-
Select an activation option.
-
Set Restore Method to From File.
-
In the File drop-down, select the backup file you want to restore. . The Name and Description of the backup file appear in their respective fields.
-
Select the Periods you want to restore. The Periods table contains the Customer Name. In addition, it has an Overwrite column that allows you to select and overwrite the consolidation periods if they already exist.
-
To choose all the periods, select this box:
(on the table header, beside Code column). -
Optionally, use
(the toggle switch) as follows:-
Click once to display only the selected periods.
-
Click again to display only the unselected periods.
-
Click once more to display all the periods (both selected and unselected).
-
-
-
Run or Schedule the job
-
Click
or to execute the job immediately (if active). -
To schedule the job for a future time, open the Schedule tab. For more information, see Schedule Tab.
-
Restore backup from a URL using an API Key
-
In the Job Type drop-down, select Restore.
-
Enter Code and Description for the job in their respective fields.
-
Select an activation option.
-
Set Restore Method to From URL.
-
In the URL field, enter the URL from where the backup is to be restored.
-
Leave the User field blank. Do not select this option.
-
In The URL Password field, enter the API Key provided by the Administrator.

-
Click
 .
. -
In the Password field, enter the password that was used to create the backup.
-
Click
 . The Name and Description of the backup file appear in their respective fields.
 -
Select the Periods you want to restore.
-
To choose all the periods, select this box:
(on the table header, beside Code column). -
Optionally, use
(the toggle switch) as follows:-
Click once to display only the selected periods.
-
Click again to display only the unselected periods.
-
Click once more to display all the periods (both selected and unselected).
-
-
-
Run or Schedule the job
-
Click
or to execute the job immediately (if active). -
To schedule the job for a future time, open the Schedule tab. For more information, see Schedule Tab.
-

Cleanup job
This type of job performs various cleanups in the system. It is good practice to have at least one instance running each day. The Cleanup Job type contains the following parameters:
- Code - unique code for the job.
-
Description - purpose of the job.
- Select an activation option.
-
Delete imported data / Excel bundles older than - the Number of days the uploaded bundles files must be kept in the history before cleanup. If unsure, set to 31.
-
Delete files older than (in days) - number of days the period backups/ report batches/ other generated files must be kept in the period restore drop-down list before cleanup. If unsure, set to 365/30/30 respectively.
-
Delete temporary data sessions (in hours) - number of days all since temporary sessions were completed and(reports etc.) are kept available for download in the job overview. Number of hours the internal database sessions are kept. Those sessions are used to store temporary data for the application. If unsure, set unfinished sessions to 24 and completed sessions to 2.
-
Delete database entries generated since more than
-
Modification log- number of days the entries in the system logs are kept in the database. If unsure, set to 365.
-
Jobs - number of days the entries in the job overview page are kept in the database. If unsure, set to 365.
-
Concurrency detection - number of hours the database entries for multi-user concurrency detection are kept in the database. If unsure, set to 6.
-
-
Delete HUB entries generated since more than (in days) - number of days the database entries from HUB are kept in the database. If unsure, set to 31.
-
Run or Schedule the job
-
Click
or to execute the job immediately (if active). -
To schedule the job for a future time, open the Schedule tab. For more information, see Schedule Tab.
-
SysIndexRebuild and Index Rebuild jobs
These jobs help to resolve certain performance issues especially cases where data imports may stall. Each job helps to rebuild database indexes:
-
SysIndexRebuild, a System job, is enabled by default and scheduled to run weekly on Saturdays at 11:59 PM.
-
It automatically rebuilds database indexes to maintain system performance.
-
-
Index Rebuild is a user-initiated job
-
It allows index rebuilding to be run on-demand and can targeted to specific tables as needed.
-
System Logs job
The System Logs job automatically emails system logs to designated users.
-
Enter Job Details. Provide the Code and Description for the job.
-
Select an activation option.
-
Select the Users who should receive the system logs by email.
-
Run or Schedule the job
-
Click
or to execute the job immediately (if active). -
To schedule the job for a future time, open the Schedule tab. For more information, see Schedule Tab.
-
Export cube job
This type of job allows you to synchronize the database with an OLAP cube. The Export cube Job type contains the following parameters:
- Code - unique code for the job.
- Description - purpose of the job.
- Select an activation option.
-
Include Dimensions - job includes dimensions when selected.
-
Include Closed Periods job includes closed periods when selected.
-
Cube Definitions- Select one of the Cube Definitions, created under the Transfer menu.
-
Run or Schedule the job
-
Click
or to execute the job immediately (if active). -
To schedule the job for a future time, open the Schedule tab. For more information, see Schedule Tab.
-
Data Integration job
This type of job allows you to run jobs that were defined in Data Integration.
The Data Integration job includes the following parameters:
- Code - unique code identifying the job type code used for the export.
- Description - lD of the user scheduling DI Studio job. This information is system-filled and cannot be modified.
- Select an activation option.
-
Data Integration Jobs - the job (from the Data Integration ) that you want the process to run.
-
Run or Schedule the job
-
Click
or to execute the job immediately (if active). -
To schedule the job for a future time, open the Schedule tab. For more information, see Schedule Tab.
-
Validation report job
This job is used for scheduling all the validation reports for all companies to run simultaneously.
-
Click
 .
. -
Select Validation report in the Job Type field.
-
Enter a unique Code and Description for the job.
- Select an activation option.
-
The Current and Ref. Periods are selected default, but you may click
 to select any other period to which you have access.
 -
The Company list displays the companies you are authorized to access in the period selected for the job.
-
The Validation report list includes all the reports available in the selected period. From the list, select the validation report to generate.
-
The Journal view field displays the available journal views, but by default, displays CONSO . You may click
to select another option. -
Select the other parameters.
-
Run or Schedule the job
-
Click
or to execute the job immediately (if active). -
To schedule the job for a future time, open the Schedule tab. For more information, see Schedule Tab.
-
Import adjustment data job
This job enables customers with Data Integration (DI) integration to load adjustments into the application with Data Integration.
See the Import adjustments table structure required in Prophix Staging.
-
Click
. -
Select Import Adjustment Data from the Job Type field.
-
Enter a unique Code and Description for the job.
- Select an activation option.
-
In the Source field, select Prophix Staging.
-
Select an Overwrite Option.
-
Overwrite Journals known in file - if selected, imported files overwrites only the adjustments that are available in the file.
-
Overwrite Journals of Period - if selected, imported file overwrites all existing journals.
-
Use journal entries from the import file - if selected, the journal entries from imported file will be used. No new ones will be generated.
-
-
In the Available tables field, select a table.
-
In the Package ID prefix field, enter a prefix (could be your initials, or any other group of letters approved by your team, etc.).
Note: The prefix you enter will be placed before the year and month for that package, helping you to quickly interact with the package upon import.
-
Optionally, select Split by company to split the package into as many companies as there are in the data retrieved.
Note: Selecting Split by company adds the company code as a suffix to the Package ID for each company.
-
Run or Schedule the job
-
Click
or to execute the job immediately (if active). -
To schedule the job for a future time, open the Schedule tab. For more information, see Schedule Tab. The job will run at the scheduled time and the data will be imported from Staging in the Consolidation HUB. The imported data packages will be in
 Transfers > HUB > Authorization. To accept or reject the package, proceed to Hub Authorization.
-
Import adjustments table structure required in Prophix Staging
The following is the required structure for the Import Adjustments (Prophix Staging) table in staging:
[ConsoCode] [nvarchar](12) NULL,
[CompanyCode] [nvarchar](20) NULL,
[JournalType] [char](1) NULL,
[JournalCategory] [nvarchar](3) NULL,
[JournalEntry] [bigint] NULL,
[JournalSequence] [int] NULL,
[Account] [nvarchar](20) NULL,
[PartnerCompanyCode] [nvarchar](20) NULL,
[Amount] [decimal](24, 6) NULL,
[Flow] [nvarchar](20) NULL,
[FlowTransRate] [decimal](28, 12) NULL,
[FlowTransactionAmount] [decimal](24, 6) NULL,
[TransRate] [decimal](28, 12) NULL,
[JournalDescription] [nvarchar](max) NULL,
[Behaviour] [tinyint] NULL,
[BeforeAfter] [bit] NULL,
[AdjCurrency] [char](1) NULL,
[AssociatedJournalType] [char](1) NULL,
[AssociatedJournalCategory] [nvarchar](3) NULL,
[CurrCode] [nvarchar](3) NULL,
[TransactionCurrCode] [nvarchar](3) NULL,
[TransactionAmount] [decimal](24, 6) NULL,
[DimensionGroup] [nvarchar](25) NULL,
[Dimension1Detail] [nvarchar](25) NULL,
[Dimension2Detail] [nvarchar](25) NULL,
[Dimension3Detail] [nvarchar](25) NULL
Export to reporting solutions job
Refer to Move consolidated data to reporting solutions for details.
Export for external applications job
Refer to Export data for external applications for details.
Schedules Tab
The Schedule tab display all the jobs that have been scheduled to run at specific times.
-
Select the job you want to run from the left-side panel.
-
Schedule the job to run as you desire. In this tab, you can schedule the jobs to run in different ways. There are four different options available:
- Repeat - allows you to specify an interval (expressed in hours, minutes, and seconds) and to repeat the Job only on specific days, weeks of the month, or months of the year.
-
Interval - allows you to specify an interval (expressed in hours, minutes, and seconds) without any day, week, or month limitation.
-
Fixed - allows you to specify one specific date and time on which the Job will be run.
If needed, you can also specify the Execution period — duration of the job schedule by entering the Period and To dates and times.
-
Send Email Notification - Administrators can schedule email notifications for all job types.
-
Choose to receive email notifications for successful executions, failures, or both.
-
Select other email recipients from the list of administrators
-
-
After you have entered details for the type of job you selected, click
. -
To view the status of the job, go to the Jobs tab or the Job Overview page.
Jobs Tab
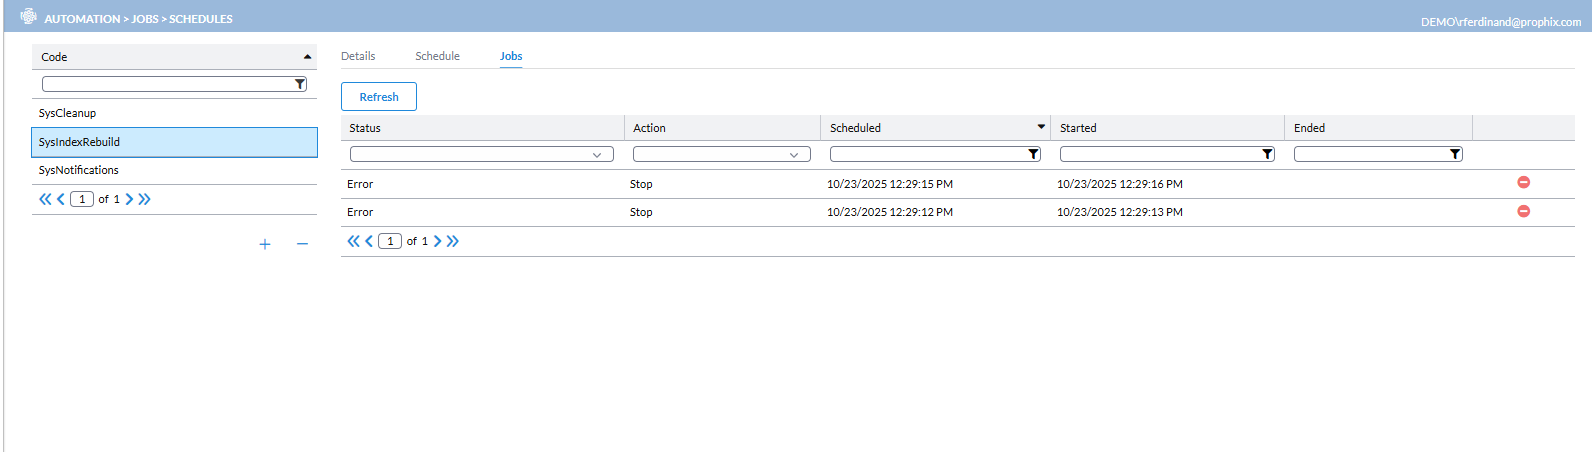
The Jobs tab displays the status of a scheduled job. Select a job from the list on the left to display the status.
- Status - result of the job run, either Done (successful) or Error. If there was an error executing the job, or a warning after the job is run, you can view the related message by clicking the icon at the end of the line for that job. You can filter the list by choosing a status from the Status drop-down list.
-
Action - shows whether the job has been run or pending.
You can filter the list by choosing an action from the Action drop-down list.
-
Scheduled date - date and time of day when the job was scheduled to run.
You can filter the list by choosing a range of dates from the Scheduled drop-down list.
-
Started date - date and time of day when the job was executed.
-
Ended date - date and time of day when the job was completed.
-
 - indicates errors while running the job. Click on the icon to see the error details.
 -
 - indicates warnings on the job. Click on the icon to see the warning details.