Create a standard report
The User Report Definition - Standard page enables you to create a linear report based on the Account structure.
The User Report Definition - Standard page is accessed from the Define User Reports page when you select a Standard type report and then, click the Define this report button.

On this page, you will see the following layout for each line:
-
Line Number- each line of the report has a Line Number that allows you to quickly identify it in the report.
-
Type - displays one of the following Line Types:
-
T - Text line.
-
A - Account data.
-
S - Summation Account data.
-
P - Page Break.
-
-
Code - this column shows the A- Account or S - Calculated Account Code.
-
Description - describes content of line number.
-
When the line type is Text, a text or description is shown here.
-
When the line type is Account of Calculated Account, the description of the selected Account or Calculated Account Code is displayed here.
-
-
Sign - shows the amount presented as negative or positive.
Parameters for adding a new line
-
Click
 . A Details pop-up appears for you to
enter the required information for the line.
. A Details pop-up appears for you to
enter the required information for the line. 
- Line Number - the line number allows you to quickly position lines within the report. To insert a line, enter the line number where you want the new line to appear.
If you add a new line, and you leave the line number blank, the line will be added at the end of the list and the next available line number will be automatically assigned when you click Save.
If you enter an existing line number, the new line will be inserted into the report in this position and the existing line will be moved to another position.
-
Type - select a Line Type used in a Standard User Report. For this type of report, four line types are available:
-
Account - allows you to select individual Account to be shown in the line. You can only select one individual account per line. If you want to show the summation of multiple accounts, use Calculated Accounts.
-
Calculated Account- allows you to select the Calculated Account to be shown in the line.
-
Text- allows you to add Text between the data lines for explanatory purpose, to make the report more understandable.
-
PageBreak- allows you to add a page break, for printing purposes.
-
-
Data account - depending on the Type you selected above, the content of this field changes as follows:
-
When the line type is Account or Calculated Account, the
 button appears beside this field allowing you to select the Account or Calculated Account Code from a pop-up. As soon as you do this, the description of the selected Account or Calculated Account appears right below the Data account field.
 -
When the line type is Text, you can enter a text or description for the line.
-
-
Indentation - allows you to shift the description more to the right. The possible values are 0 to 4, and Right (right aligned text).
-
Font - allows you to define the font properties: Bold, Italic or Underlined. If you do not select anything, a normal text font will be used.
-
Layout - allows you to change the layout of the line. You can draw a Box around the field, or put a Grey background. If you do not select anything, a normal text font will be used.
-
Sign - allows you to change the sign with which the amount is presented. Typically, if your Revenue account is in negative sign (i.e. Credit account) you will want to reverse the sign (i.e. set it as negative) so you can present it in positive.
- Line Number - the line number allows you to quickly position lines within the report. To insert a line, enter the line number where you want the new line to appear.
-
Click
 .
. -
Click
 to return to the Define User Reports page and click
  to view the report containing the parameters you just added. See sample report.
Modify an existing line
-
To modify an existing line on this page, click on the line. The Details pop-up is displayed.
-
Make your changes.
-
Click
to save your modifications.
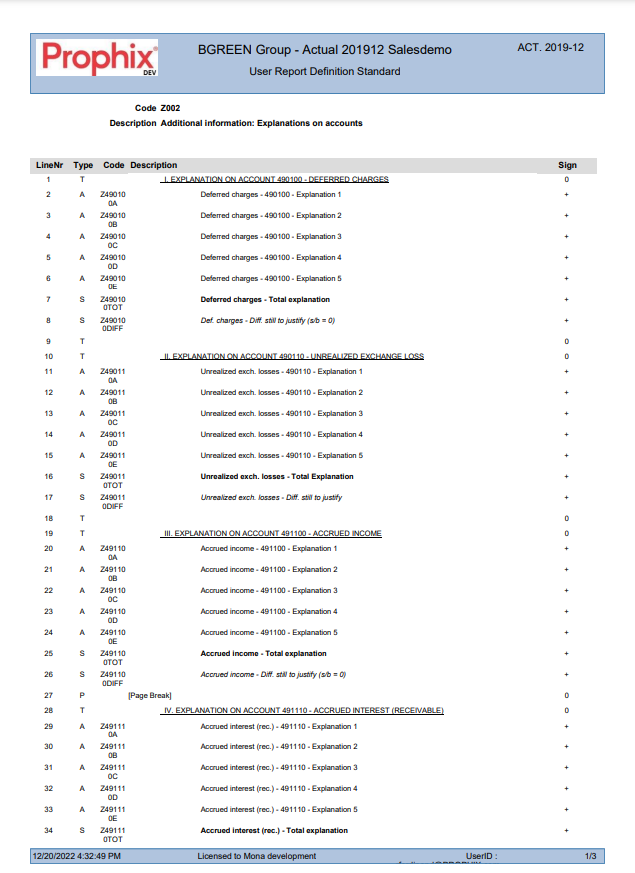
Sample Report
This is a sample of a standard user-defined report.