Back up and restore periods
Through the Backup/Restore Periods page, you have the ability to generate backups of consolidation periods and subsequently restore them when needed. This feature allows you to safeguard and preserve your consolidation data by creating secure copies of specific periods. In the event of data loss or errors, you can restore these backups to revert to previous states, ensuring data integrity and facilitating recovery processes.
Note: Only consolidators and administrators have the ability to back up and restore periods.
Why do a backup?
Backups are important for several reasons:
-
Troubleshooting: When experiencing an issue in your environment and you contact Support, sending them a backup file to help troubleshoot will be invaluable. The support team can use the backup file to make a copy in a test environment and troubleshoot, causing no disruptions to the production environment.
-
Time saving: If during the consolidation process mistakes were made, you can quickly restore the period from a backup file without involving your IT or Cloud Operations team to do a full restoration, saving you time and effort.
-
Backup files can be restored and used for simulating different conditions. For example, you can restore a period, change the code, and use different currency rates to test different scenarios without having any impact on the active period.
To access the Backup/Restore Periods page, click Configuration > Periods Management > Backup/Restore Periods.
Back up a period
The Backup tab is used for creating backups of consolidation periods. This is the default tab on this page and includes the following:
-
Periods - the Code and Name of the consolidation periods.
-
System Backup - additional system backup structures, for example, Mapping tables, Import/Export Structure, Content Panels and Configuration details, that you can include.
-
Password - to prevent users from restoring this backup at will, enter a password to secure the backup file.
-
Expiration Date - the last date by which the backup file can be restored.
-
Custom Filename - a descriptive name for the backup file.
To back up a period:
-
Access the Backup/Restore Periods page. The Backup tab is the default page.
-
From the Periods grid, select one or more consolidation periods you want to back up.
-
From the System Backup box, select the system structure you want to back up. All the associated structure items are displayed in the Name box to the right.

-
In the Name box, select all rows of the structure item you want to include in your backup.
- Repeat steps 3 and 4 for all the system structures you want to include.
- Optionally, click Include Adjustment Files to back up the adjustments for the selected consolidation period.
-
Optionally, in the Expiration Date field, enter a date to secure the backup file. The backup file cannot be restored after the date you specify in this field.
-
In the Custom Filename field, you can enter a unique name for the backup file . Otherwise, the system will use a default file name format.
- Click
 to create the backup. A .zip backup file is created is created and saved in a temporary folder on your server. As files stored in temporary folders are deleted from time to time (commonly 30-day cycles) the best practice is to save the backup file on a location on your computer.
Optionally, go to the Restore tab, and in the File drop-down list, look for the file you just backed up and click the Download File link to download and save it to your computer.
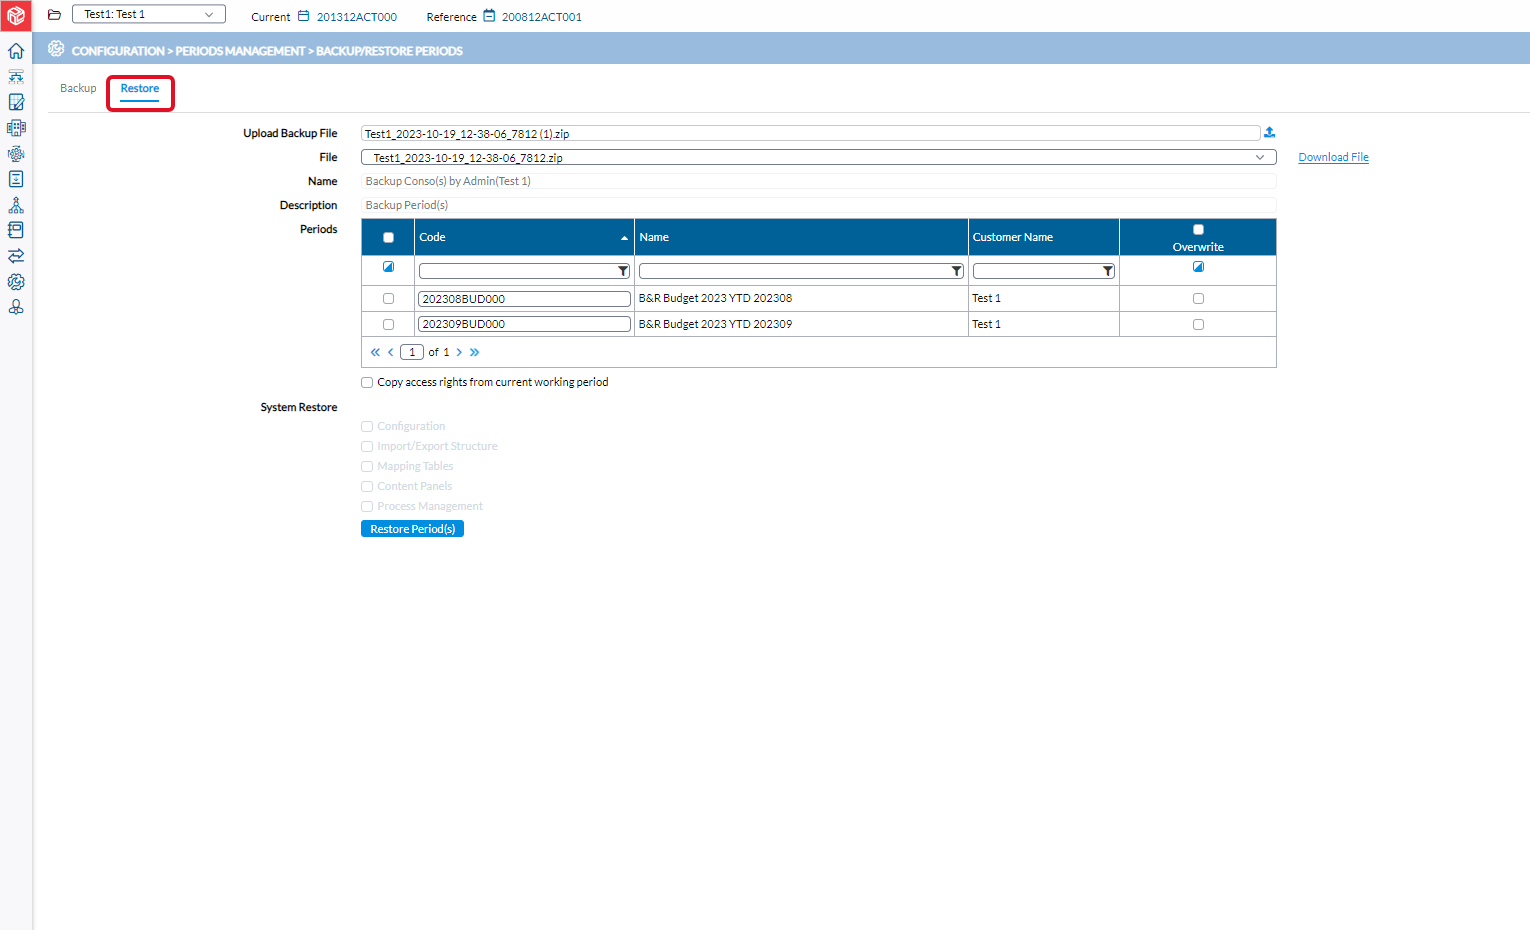
Restore a period
The Restore tab is used for restoring the backups you have previously made. This tab includes the following:
-
Upload Backup File - clicking in this field displays the file explorer for you navigate and select the backup file, a .zip file.
-
File - name of the uploaded file.
-
Name - name of uploaded file.
-
Description - description of the uploaded file
-
Consos - consolidation periods in the uploaded .zip file.
-
System Restore - a list of additional system structures, for example, Mapping tables, Import/Export Structure, Content Panels and Configuration details, that you can select to restore.
To restore data:
-
Access the Backup/Restore Periods page and click the Restore tab.
-
Click
 , navigate to and select the .zip backup file you want to restore. The selected file is uploaded and the consolidation periods available in
the backup are displayed in the Periods grid. The name and description of the uploaded file appear in the Name and Description fields and cannot be modified.
, navigate to and select the .zip backup file you want to restore. The selected file is uploaded and the consolidation periods available in
the backup are displayed in the Periods grid. The name and description of the uploaded file appear in the Name and Description fields and cannot be modified. Note: If restoring a password-protected backup file, the system will prompt you for a password. You must provide the correct password, for the content of the backup file to display.
-
In the Periods grid, select the consolidation period(s) you want to restore. The File field displays the name of the selected folder.
-
In the File field, you have the option to select a backup file and download it from the temporary folder to your computer. To download a backup file, select it from the list, and click the Download File link to download and save it to your computer.
Note: Files backed up using the Make backup of the period option when deleting a period on the Define Periods page can also be retrieved from the temporary folder and downloaded to a desired location from File drop-down list. You may need to refresh the page.
-
To overwrite the current period with the restored period, click Overwrite.
-
Optionally, select Copy access rights from current working period to use the same security as defined in the current consolidation period instead of the security stored in the backup file.
-
From the System Restore list, select any additional features (Mapping tables, Import/Export Structure, Content Panels and Configuration details) you want to restore.
-
Click
 .
.