Import or export file structure
On the Import File Structure and Export File Structure pages, you can define the structure of your file to match the files you want to import /export. This requires defining the general properties of the file structure, specifying the type of data and other parameters. After this initial configuration, you can use the file structure to import data or export data that share the same structure.
The Import and Export File Structure pages are similar and their descriptions have been combined in this article.
To access the Import or Export File structure, click ![]() Transfers > Data > Define File Structure and then, select Import or Export
Transfers > Data > Define File Structure and then, select Import or Export
Tip: You have the options to create a new file structure or copy an existing file structure.
Import file structure
An Import File Structure allows you to import account, company, flow, and dimension data from external files into Financial Consolidation. Configuring the file format before performing any data import ensures that you are pulling the right data from the source to its intended target in the application.
To access the Define File Structure - Import page, click ![]() Transfers > Data > Define File Structure > Import.
Transfers > Data > Define File Structure > Import.
![]()
The file properties section of the Import file structure is used to specify the type of file structure that will be used for the import.
Create an import file structure
To define an import file structure, you will:
Specify general file properties
To start, you must define the file properties in the General tab. The file properties describe how the import module handles the data in the import file.
![]()
-
Enter the file ID.
-
In the Type of Amount group box, select any of the following as applicable.
-
Net Amounts - if selected, indicates that the imported figures are net amounts (all amounts are in one column).
-
Debit/Credit amounts - if selected, indicates that the Debit amounts are in different columns from Credit amounts.
-
Summarize Interco - If selected, the closing amount of an account will be a summation of all lines indicated with or without a partner. Unselected, it indicates that you have a separate line with the closing amount for an account, an additional line for each intercompany partner (and no line for third party amounts).
Example:-
Summarize Interco (selected)
-
Company A — Account 123456 — No partner — Amount = 100
-
Company A — Account 123456 — Partner X — Amount = 25
-
Company A – -Account 123456 — Partner Y — Amount = 75
-
Closing amount Account 123456 = 200
-
-
-
Summarize Interco (not selected)
-
Company A — Account 123456 — No partner — Amount = 200
-
Company A — Account 123456 — Partner X — Amount = 25
-
Company A — Account 123456 — Partner Y — Amount = 75
-
Closing amount Account 123456 = 200
-
-
-
-
Signed Amounts - indicates that the amounts in the import file are signed: + for the Debit amounts, – for the Credit amounts. This option can only be selected in combination with Net Amounts.
-
Calculate Profit- if selected, the result of the period will be calculated as the difference between the Debit and Credit accounts when importing the file. Two additional accounts, one in the Balance Sheet and the other in the P&L, will be created to book automatically the result of the period. This could be useful when the import file does not contain a specific account for the result of the period in the Balance Sheet and P&L accounts, e.g. in a flat file where the appropriation of results hasn’t been processed—which is the preferred way to import data.
-
Negative Charges- allows uploading the charge amounts with negative signs (inverses the sign convention). This option can only be selected in combination with Net Amounts.
-
-
Scale of Amounts- the scale of value used in the import file (e.g. x 1=units, x 1000=thousands, etc).
-
File Type: Specify the file type. You can import XLS (Excel, XLS/XLSX), CSV (Comma Separated Value) or from the HUB (no column definition needed then because this is a custom setup). Parameters required for each file type are different.
-
Proceed to the Type of data tab to specify the type of data that will be included in the import.
Type of data
Depending on the type of data, you can define the default data type that will be overwritten during the import and the default mapping tables that will be used for the process.
This default may be changed during the actual import.
Note: The standard import process is as such that per Type of data, the Local amounts are cleared and populated with data from the file during import.
-
In the Type of data tab, select the type of data that will be overwritten during import. For example if you select Dimensions only, the other Types of data such as Flows will not be cleared and replaced with information from the file.
-
From the Option group box (Import File Structure only), select the option that reflects how you want to load data during the import only:
- Discard errors on rows with an amount of zero - If you select this, the technical file validation will only show errors where amount is not equal to zero.
-
Replace imported types - Use this option to replace data in the application. For example, if you select this option and import an account, all the accounts of the same type will be removed an overwritten. You might find this option in a workflow where you upload your trial balance and manually complete for instance quantity accounts with online input forms. In case you need to update your trial balance (B, P) with a new version without touching other accounts (C, O, Q), you could use this parameter. For example:
-
If one or more (B) accounts are in the upload file, complete balance sheet (B) will be overwritten, while P&L (P), Contingencies (C) Other (O) and Quantity (Q) accounts remain untouched.
-
If one or more balance sheet accounts (B) and one or more income statements (P) accounts are in the upload file, the full balance sheet and P&L will be overwritten. Contingencies, Other, and Quantity remain untouched.
-
-
Replace imported accounts - instead of overwriting all existing data for the Type of data selected, it only removes data for the selected Type of data AND only the specific account numbers or codes available in the import file.
-
Proceed to the Options tab.
Options
-
In the Options tab, the File Type you select (in the General tab) determines the additional options available to you. Specify the additional items you want to include in the structure and how you want the data to be organized.
For example:
-
If the file type is CSV (Comma Separated Values), you need to specify the CSV Separator, Decimal Separator and Thousand Separator, etc.
-
If the file type is HUB, then, you must enter the Package ID.
-
If importing from the staging environment, you must enter a prefix for the package in the Package ID prefix field. Adding a Package ID prefix puts the prefix before the year and month for that package, helping you to quickly identify and interact with the package upon import. You also have the option to select the Split by company option that will split the package into as many companies as there are in the data retrieved. Selecting Split by company adds the company code as a suffix to the package ID for each company.
-
-
Proceed to the Parameters tab.
Parameters
The parameters required depends on the type of data for import or export. For example parameters for connecting to Odata is different from the ones used for data in a balance sheet.
The screenshot below shows the parameters for balance sheet or bundle data.
![]()
In the Parameters tab, map the columns to the attributes. Simply match the column identification to the field name (e.g. Column A for Company ID, Column B for Account Number, Column C for Flow Number and so on).
This section also supports adding functions (like
Substr/Merge/Prefix/Suffix/Fix) to the selected columns.
For some parameters you can add additional parameters to the one selected in
the field by clicking  next to the field:
-
Substr - Substract, recover a part of a cell content:
-
Additional fields:
-
Start position, e.g. 4 for as from 4th character.
-
Number of characters to recover.
Example:Content of the cell B2: ACC123456
Field: column B
SUBSTR fields: 4 and 6
Result: 123456
-
-
-
Merge: concatenate two cells.
-
Additional field:
-
Column to merge with
Example:Content of the cell A2: ACC
Content of the cell B2: 123456
Field: column A
MERGE field: column B
Result: ACC123456
-
-
-
Prefix- action is to add a chain of characters in front of the value of the imported cell.
-
Additional field:
-
Chain of characters
Example:Content of the cell A2: 1000
Field: column A
PREFIX field: CPY
Result: CPY1000
-
-
-
Suffix - action is to add a chain of characters at the back of the value of the imported cell.
-
Additional field:
-
Chain of characters
Example:Content of the cell A2: ACT000
Field: column A
SUFFIX field: 209912
Result: 209912ACT000
-
-
-
Fix - action is to add a fixed chain of characters as content.
-
Additional field:
-
Chain of characters
Example:Field: empty
FIXE field: DIMGROUP
Result: DIMGROUP
-
-
You can use this functionality up to five levels, e.g.,
Field: 9912
+ Prefix / field: 20
+ Suffix / field: ACT000
Result: 2099ACT000
Custom Fields
In addition to mapping columns to field names, you can use the Custom Fields section to collect additional information from the source data and save in the temporary table for further handling via import rules. For example, using custom fields you can import an Excel sheet having 12 columns of amounts and “transform” that via the import rules into a set where all the data is a set in one column so it can be imported in one single operation.
When creating an import structure, you can click  to open the optional Custom Fields section and enter the source (column/field) to collect and keep for future handling.
![]()
Import rules
An import rule allows you to transform the imported /exported information. Typical transformations include:
-
Removing rows that are not useful for the transfer of data
-
Changing the content of some fields based on some information
-
Adding content based on some other information
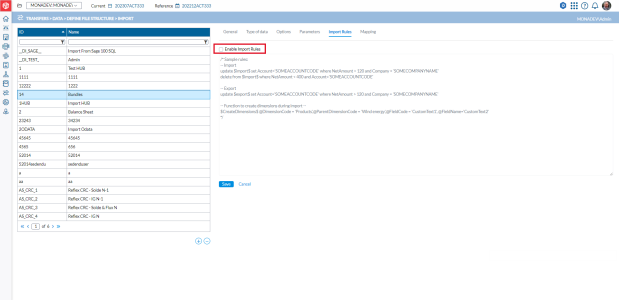
When you select Enable Import Rules, the (script) editor area will be enabled, allowing you to write /edit (with the right permission) the transformation script using SQL language. The import process will then also know that there is a script to apply on the imported data and will do so.
Note: If the rule is not enabled, even when there is one in the editor, the import /export process will not use it.
For more information about import rules, see the Financial Consolidation Import Rules guide.
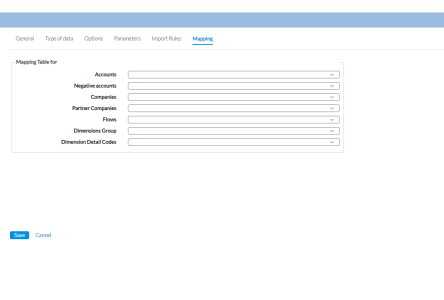
Mapping (import file structure only)
In this tab are the different types of mapping tables that can be used during import.
Note: Mapping tables are defined on the Define Mapping Tables page and appear in their applicable drop-down lists on this page.
-
Choose the applicable mapping table for your type of data.
-
Click
 to save your import file structure.
Export file structure
An Export File Structure is the file format you configure to move or copy data from Financial Consolidation to an external target.
To access the Define File Structure - Export page, click ![]() Transfers > Data > Define File Structure > Export.
Transfers > Data > Define File Structure > Export.
![]()
Create an export file structure
Defining an export file structure is similar to defining an import file structure.
To define an export file structure, you will:
Specify general export file properties
-
Enter the file ID.
-
Type a Name to describe the export file structure
-
In the Type of Amountgroup box, select any of the following as applicable.
-
Net Amounts - if selected, indicates that the export figures are net amounts (all amounts are in one column).
-
Debit/Credit amounts - if selected, indicates that the Debit amounts are in different columns from Credit amounts.
-
-
File Type: Specify the file type. You can import XLS (Excel, XLS/XLSX), CSV (Comma Separated Value) or from the HUB (no column definition needed then because this is a custom setup). Parameters required for each file type are different.
-
Proceed to the Type of data tab to specify the data that will be included in the export.
Type of data
-
From the Type of data list, select the data to include in the export.
-
Proceed to the Options tab
Options
In the Options tab, you specify the additional items you want to include in the structure and how you want the data to be organized. The File Type you select (in the General tab) determines the additional options available to you.
-
Optionally, to add a header row to the export file structure, select
 .
. -
Select the other options . For example if the file type is:
-
CSV (Comma Separated Values), you need to specify the CSV Separator, Decimal Separator and Thousand Separator, etc.
-
HUB, then, you must specify the Default Period, Package ID, amount types (Local amounts, Contribution, Consolidated Amounts), and the Companies from which the data will be extracted.
Note: If you want the exported data to be available via OData from the export, select OData Access.
-
-
After specifying the options relevant to the file type, proceed to the Parameters tab.
Parameters
The parameters required depend on the file type selected for export.
Note: The Parameters tab do not apply to HUB File Type
-
Enter the values for the parameters displayed on the page.
-
In addition to providing values for the parameters, you can use the Custom Fields section to collect additional information from the source data and save in the temporary table for further handling via export rules. Optionally, click
to open the Custom Fields section and enter the source (column/field) to collect and keep for future handling. -
You have these options:
-
To enable export rules for the export file structure, proceed to the Export Rules tab.
-
To save the export file structure without enabling the export rules, click
.
-
Export Rules
An export rule allows you to transform the exported information. Typical transformations include:
-
Removing rows that are not useful for the transfer of data
-
Changing the content of some fields based on some information
-
Adding content based on some other information
When you select Enable Export Rules, the (script) editor area will be enabled, allowing you to write /edit (with the right permission) the transformation script using SQL language. The export process will then also know that there is a script to apply on the exported data and will do so.
Note: If the rule is not enabled, even when there is one in the editor, the export process will not use it.
Click to save the export file structure.
Duplicate an import /export file structure
Instead of creating a new file structure from scratch, you can copy an existing one to use as a template.
Both the Import and Export file Structure pages have a  button that you can use on the General tab to duplicate an existing structure.
-
From the list on the left-side panel, select the structure you want to duplicate. The general details of the structure are displayed on the right-side panel.
-
Click
. -
Enter a unique ID and Name for the new structure.
-
Make additional modifications to meet your need.
-
Click
.