Manual input - group adjustments
Use this section to manually add group adjustments.
To access the Adjustments page, click  Adjustments. The Adjustments page opens by default.
Add a group adjustment
On the Adjustments manual input page, enter the information required in each field:
-
Open the Adjustments page.
-
Click
 to open the manual input page and create a journal entry.
 -
Enter the information required in the following fields:
- Company - company code and name. Enter a company code or click
 to search for one.
 -
Journal - journal code and name. Enter a journal code or click
to search for one. Note: When you enter or select a valid code, the Associated Journal and Journal Entry fields are automatically filled in.
-
Associated Journal - journal into which the adjustment will be carried forward. You can leave this as automatically assigned, or
to search for another one. -
Journal Entry - number assigned automatically by the system to the adjustment. You can change this number if you wish.
-
Journal Text - text to describe the journal.
-
Currency - currency you want to use for the adjustment. You can choose to make the group adjustment in Local or in Group currency
-
Third Party- use this to specify when you want to make the adjustment — Before or After third party calculations.
-
Behavior - the action you want to perform with the adjustment, for example, carry it forward to reserve, copy, reverse, etc.
-
Attachment - if enabled, use this to add a file to the adjustment.
-
Approved: This status is set by a consolidator or administrator after reviewing all adjustments made by the end user. It means the data is approved and ready for use in consolidation. After this option is selected, the data becomes locked, and the end user can no longer make changes. To ensure that only approved adjustments are included in the consolidation, enable the Include only Approved user journals option on the System Configuration page.
- Company - company code and name. Enter a company code or click
-
In the Sort by field, select how you want to sort the lines - by Line number, Balance Sheet Accounts first, or Profit & Loss Accounts.
-
In the Tax field, if applicable enter a tax rate, and click Apply. This adds lines with the calculated Deferred Tax based on the tax rate and on Specific Accounts.
-
Go to the table below to add lines (details) of the adjustment.
-
Provide the following information to add a line to the adjustment:
- Line - line number of the adjustment.
-
Account - account code and the account description.
-
Partner - partner code. Applies only to intercompany accounts.
-
Flow - flow code. Applies only if the account is defined to work with flows.
-
Debit - debit amount.
-
Credit - credit amount. Applies only to intercompany accounts.
-
Historical Rate - the historic currency exchange rate at the time of the transaction for the specific data line.
-
Transaction Amount - applies only to intercompany accounts.
-
Currency - currency code. Applies only to intercompany accounts.
-
Dimension - clicking
 allows you to access analytical dimension information for the period. It is activated after saving the entry and if the Financial Consolidation Analytical Dimensions function has been configured and the account is defined to work with analytical dimension information.
-
You have these options:
-
To view the Debit and Credit sums of the line you entered by account, click
 to open the View by Account pop-up.
 -
To divide or multiply selected amounts by a specific value, first select the lines and then, click
 to open the Multiply /Divide pop-up where you can enter a value to either divide or multiply the selected amounts. See Multiply/ divide an adjustment for details.
 -
To add additional lines, click
 to add a new set of rows for your input at the bottom of the existing rows.
-
-
In the Actions column, you can perform any of these actions on each line:
-
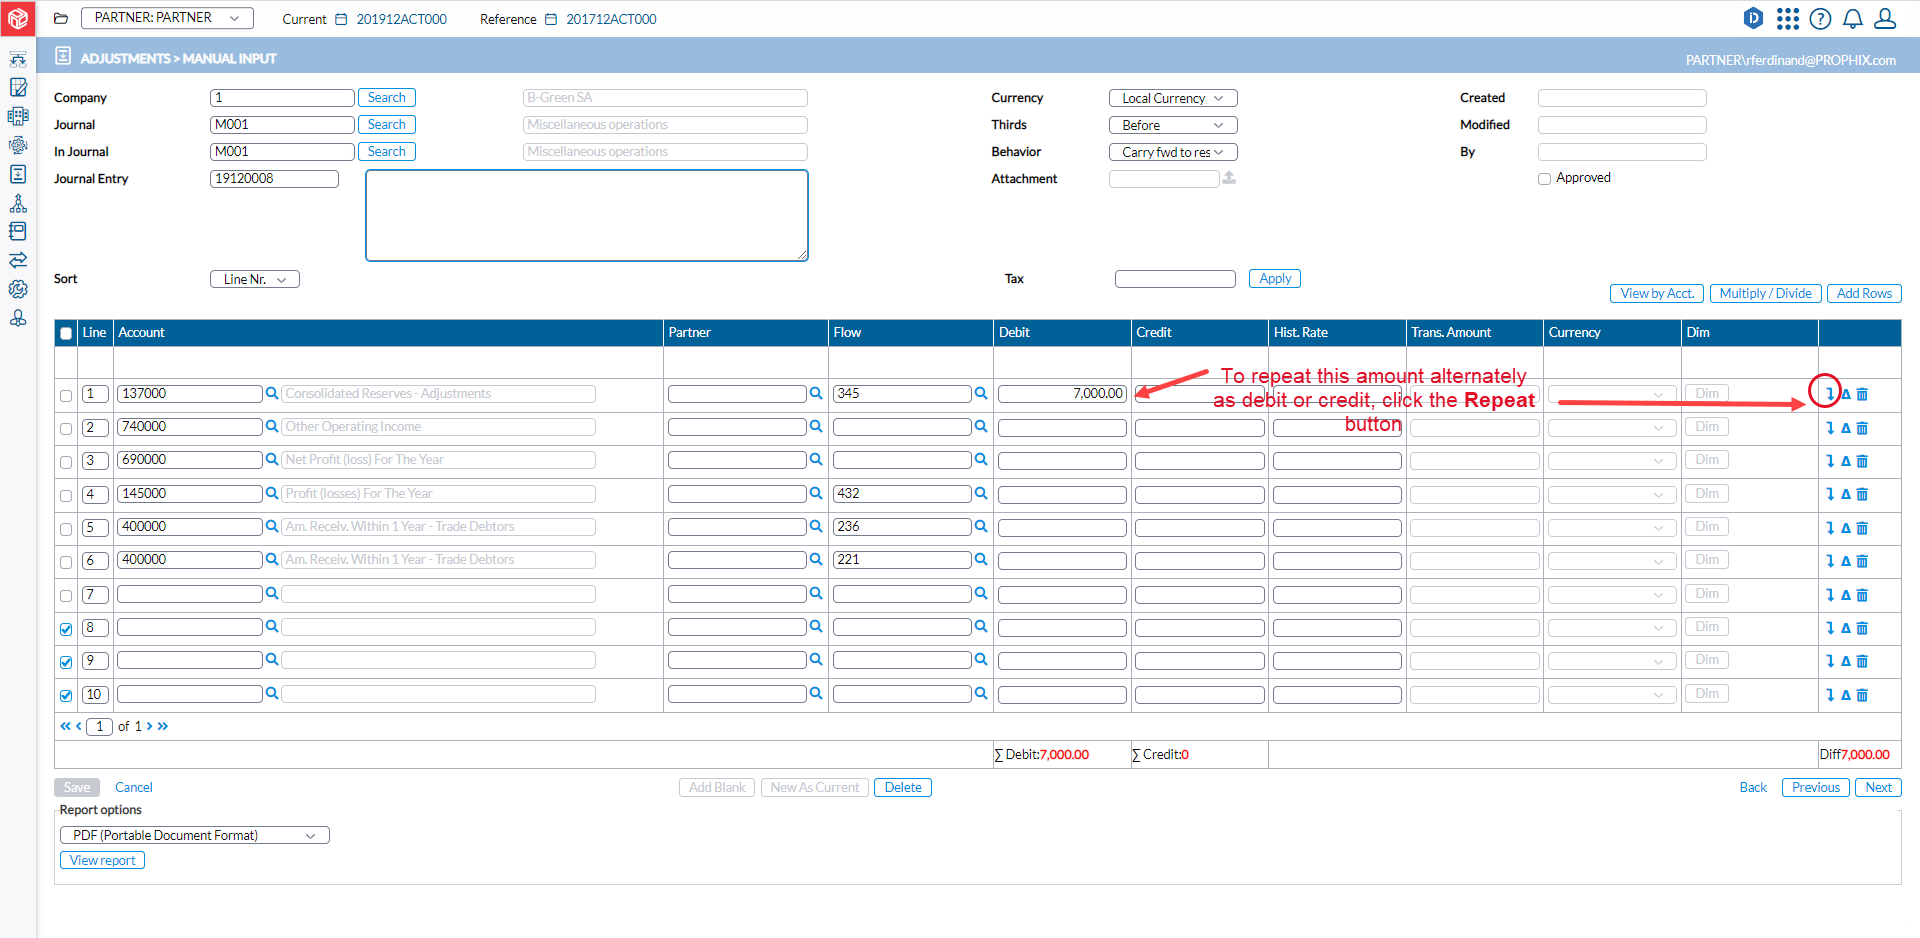
 Repeat button - allows you to repeat the amount from the current line. For example, if you have a journal entry impacting for the same amount multiple accounts alternately as debit or credit, instead of filling in the account codes on each line, you can use this option to facilitate the input of adjustments having repetitive amounts and avoid input error. See Repeat an amount for details.
 -
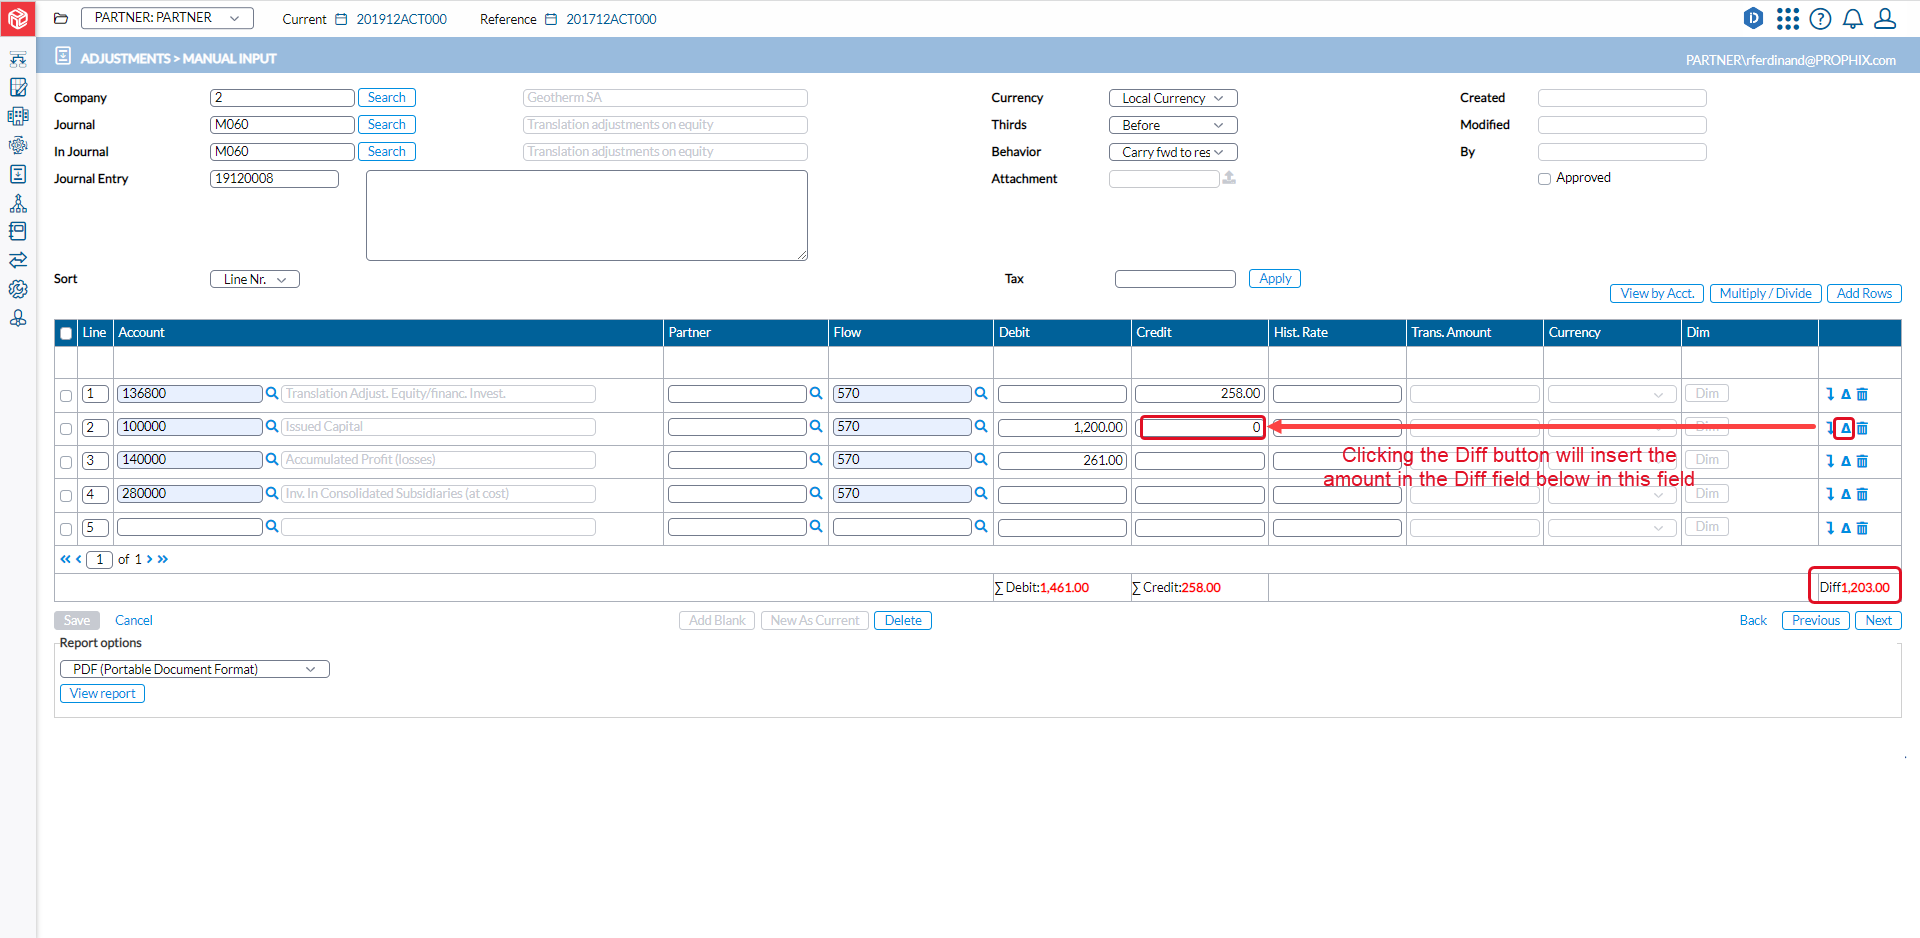
 Difference button - inserts the difference between the total Debit and Credit amounts on the line in which you click the button.
 -
 Clear button - clears the content of a selected line.
Note: At the bottom of this table is the Transaction Summary showing the Total Debit, Total Credit and the Difference amounts on the adjustment lines you enter.
-
-
When you have finished with your input, click
 . The Add journal , Add journal as current, Delete journal buttons are activated:
 -
 - allows you to start a new blank adjustment.
 -
 - allows you to start a new adjustment by copying the layout of the current adjustment, including selected accounts and flows.
 -
 - deletes the saved adjustment.
 -
 - navigates away from the Group Adjustment Manual Input page and takes you back to the View (Group Adjustments) page.
Note: All modifications that you made will be lost if you click
without saving. -
 - takes you the previous group adjustment.
 -
 - takes you to the next group adjustment.
-
-
To generate a report, select a report format. Options include PDF, XLS, and XLSX.
-
Click
 to produce the report. After the report is generated, a download link appears below for you to click and view it in the file format selected.
Multiply /divide an adjustment
The button is very useful during a monthly reporting. You can easily
recalculate a provision, depreciation, etc. to the Year-To-Date value.
Note: The button will work on all the lines that you select.
-
Click
. The Multiply/Divide pop-up appears. -
Enter the fraction by which you want to multiply or divide.
-
Click
 . The amounts are recalculated.
 -
Click
to save the adjustment.
Repeat an amount
Using the Repeat function you can change all the amounts of an
adjustment.
-
Enter the amount you want to repeat on any line.
-
Select the amount and then, click
to copy the amount to the other lines. The new amounts will alternate between debit and credit. Note: When using this option, it is recommended to enter the accounts in such an order that the amounts can alternate properly between debit and credit.
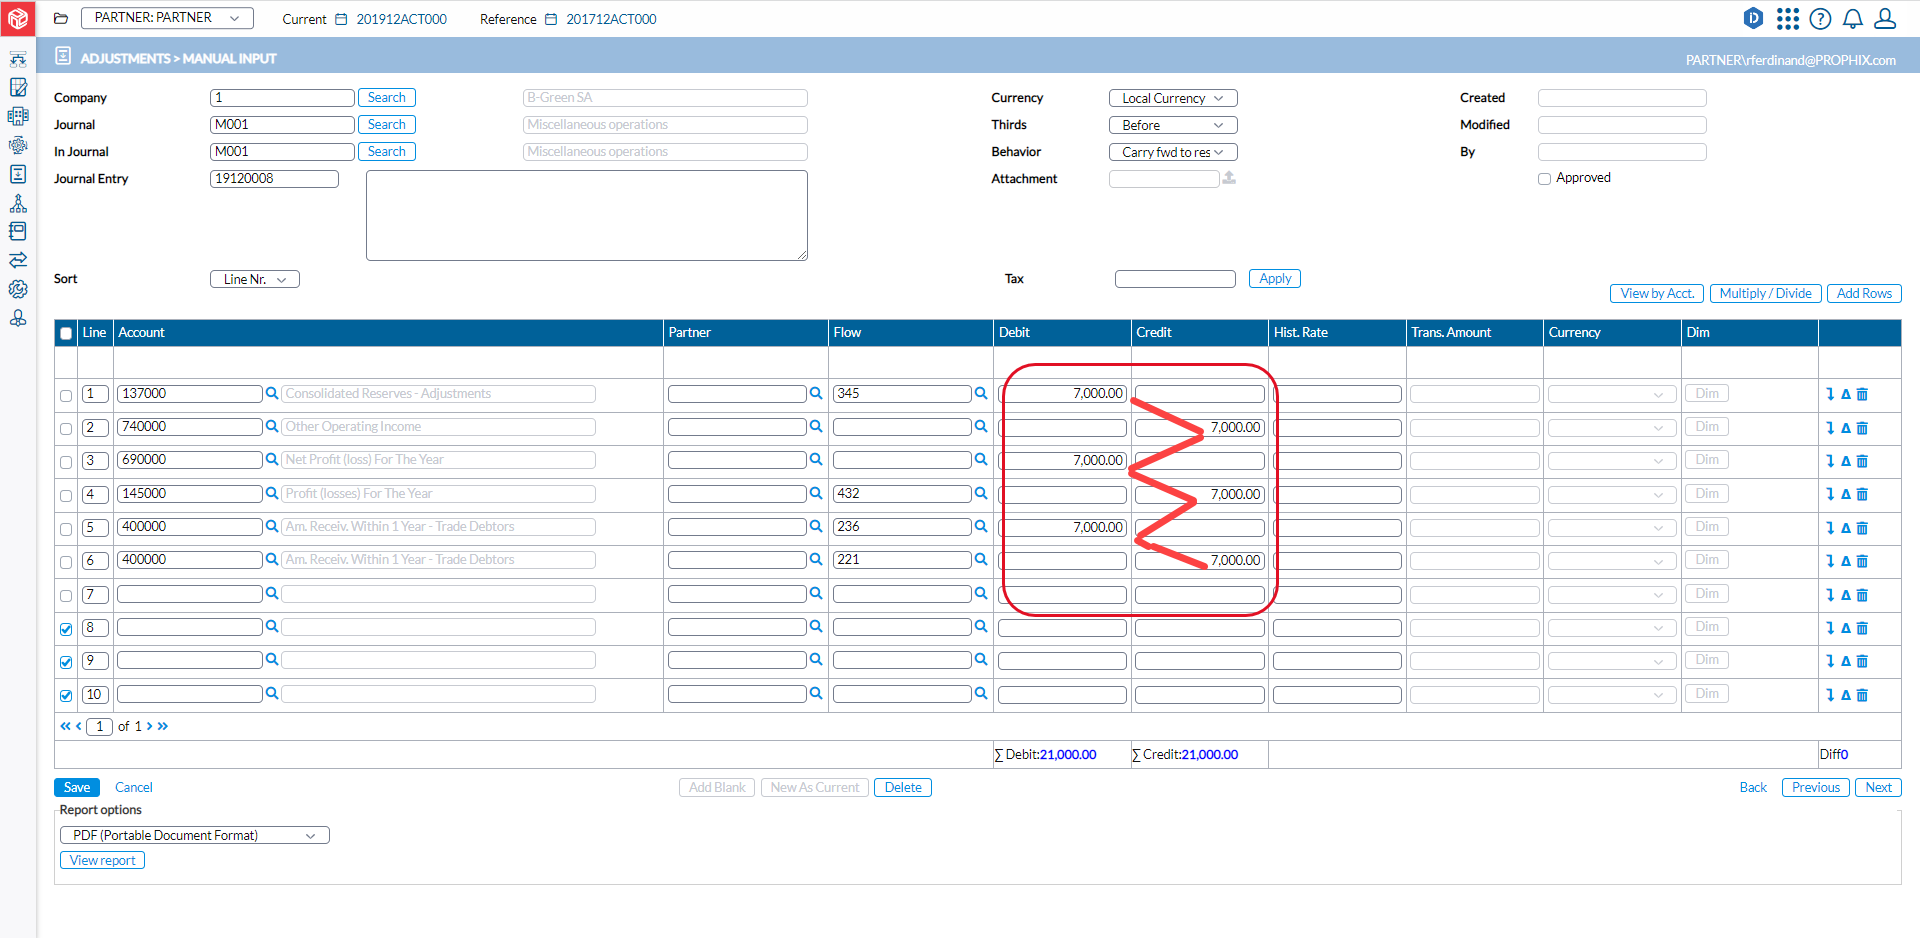
This is what happens after you use the Repeat button:
Use the Difference button
You can use the Difference button to balance the adjustment.
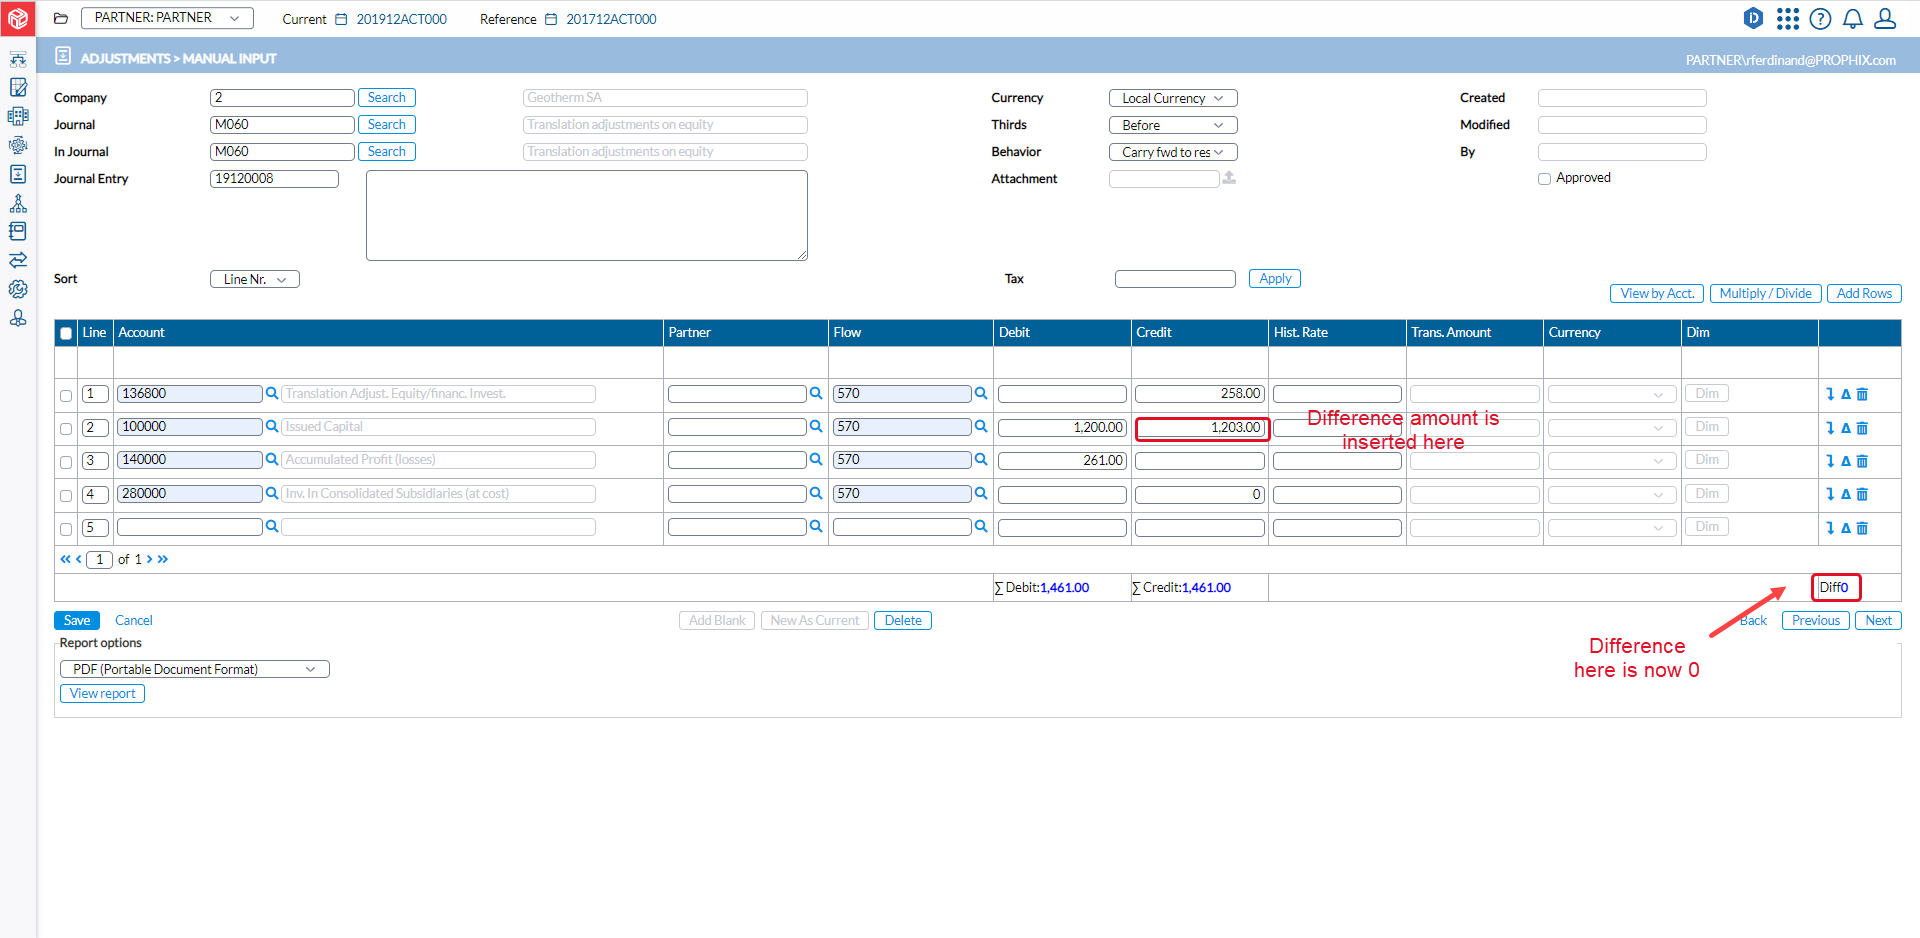
Clicking the Difference will insert the amount in the Difference field below (1,203.00) into the highlighted field.
After using the Difference button, the Difference amount is inserted into the highlighted field and the Difference field is now 0, in this example.