Configure event details
On the Configure Event Details page, you can enter all the necessary details, including triggers and controls, to set up an event. You can also save some time by duplicating existing event details and modifying them to create new ones.
To access the Configure Event Details page, on the Create Custom Events page, click  .
.
This page displays the event you configured on the Create Custom Events page, including the Event Code and Description.

Add event details
-
On the Configure Event Details page, click
 . The Details dialog is displayed.
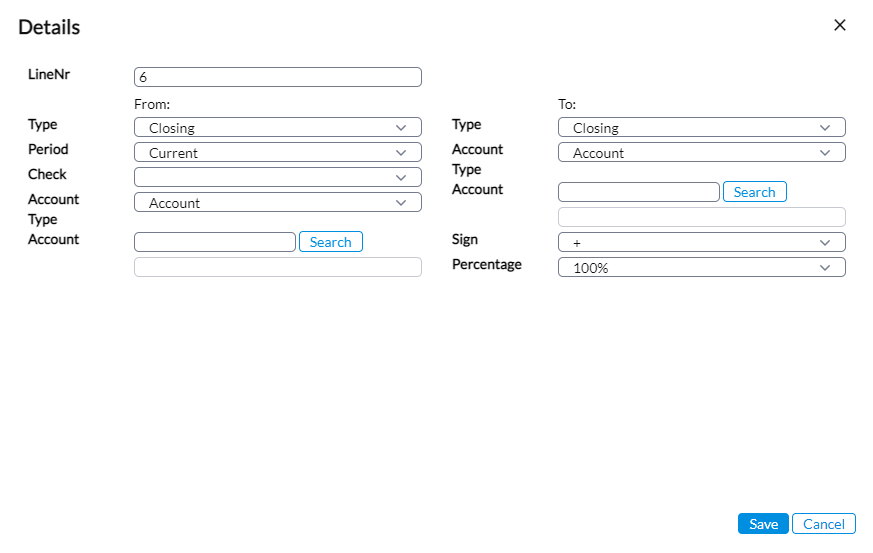
-
In the LineNr field, enter a Line number.
-
In the Source section on the left, enter the information required in each field. The event will be generated based on the account information specified in this section.
Note: On the left side (the Source section), you will select the details of the parameters triggering the rule. These details will be analyzed by Financial Consolidation to generate the event based on the account information specified on the left (Source section), and the posting will be created based on the account information specified in the Target section on the right.
- Type - type of data for example, Closing (Account), Closing Flow, etc. From the drop-down list, choose a type.
Note: The Type you select determines the fields that are displayed below. For example, if you select Closing Flow, additional fields such as the Flow Type and Flow, display below.
-
Period - Current or Reference period.
-
Check - option to specify a check on the figures. For example, <0 means the event will be generated if the figures are <0, and >=0 means the event will be generated if the figures are >=0. If no check is specified, the event will be generated regardless of the sign on the figures.
-
Account Type - the type of account. For example, Calculated Account or Specific Account; or either account.
-
Account - based on the Account Type, you selected, the name of this field changes to Calc Account or Specific Account. Click
 to open the corresponding pop-up from you can select the Account/Calculated Account/Specific Account code to be included in the event.
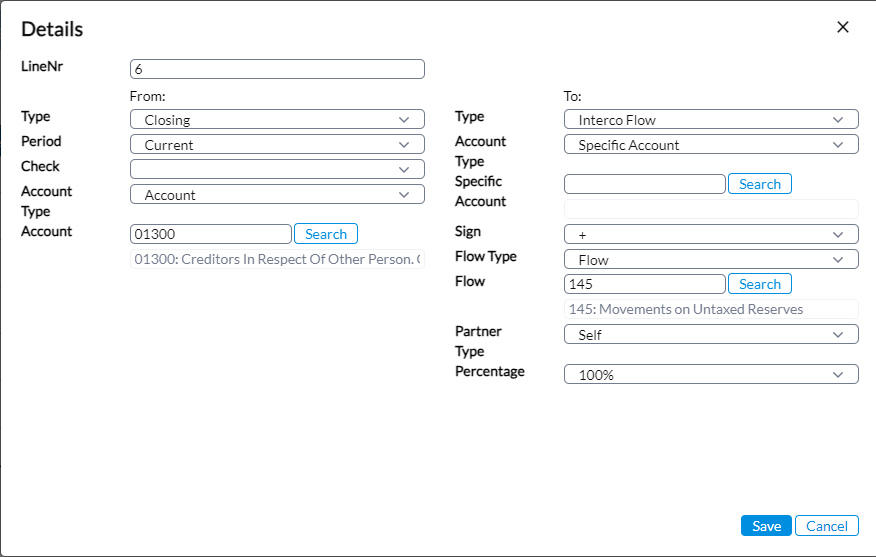
 - Flow Type - this field appears only when you choose a Flow type from the Type drop-down list. Choose a flow type: Flow, Calculated Flow, or Specific Flow.
-
Flow - based on the Flow type, you choose the Flow/Calculated Flow/Specific Flow Code to be included in the Event.
- Type - type of data for example, Closing (Account), Closing Flow, etc. From the drop-down list, choose a type.
-
In the Target section on the right, enter the information required in each field. The posting will be created based on the accounts information specified in this section.
- Type - type of data for example, Closing (Account), Closing Flow, etc. From the drop-down list, choose a type.
Note: The Type you choose determines the fields that are displayed below. For example, if you choose Closing Flow, additional fields such as the Flow Type and Flow, display below.
-
Account Type - the type of account: Account or Specific Account or Same as Source (previously self).
-
Account - based on the Account Type, you chose , the name of this field changes. Click
to open the corresponding pop-up from you can select the Account//Specific Account code to be included in the rule. - Flow Type - this field appears only when you choose a Flow type from the Type drop-down list. Choose a flow type: Flow or Specific Flow or Same as Source (if the flow is defined in the source).
-
Flow - based on the Flow Type, you choose the Flow/Calculated Flow/Specific Flow Code to be included in the Event.
-
Sign - input amount, either + or –
-
Percentage - percentage to be applied on the figure found on the account specified in the Source section. The resultant figure will be the one posted in the event adjustment
- Type - type of data for example, Closing (Account), Closing Flow, etc. From the drop-down list, choose a type.
-
Click
 to save the event details.
 -
To return to the Create Custom Events page, click
 .
.
Duplicate event details
To duplicate existing event details line:
-
On the Create Custom Events page, place your cursor on the row you want to copy, and then, click
 .
. 
-
In the Details dialog, modify the event details as desired to create a new one.
Note: If you do not provide all the information required and attempt to save, you will be prompted to provide the missing information.
-
Click
. The new record is displayed on the Create Custom Events page.
Delete event details
To delete event details:
-
On the Configure Event Details page, place your cursor on the event record you want to delete and click
 .
. -
In the Confirmation request dialog box, click
 .
.